Sound Files
NOTE:
To use the sound library, we have to include the p5.sound library in our project’s index.html file after the p5.js file, like this:
<script src="https://cdn.jsdelivr.net/npm/p5@1.7.0/lib/p5.js"></script>
<script src="https://cdn.jsdelivr.net/npm/p5@1.7.0/lib/addons/p5.sound.js"></script>
Playing Sounds
Let’s use some html elements in a sketch to create a simple sound player.
First, we’ll load an audio file using the loadSound() function and test it. This is similar to how we have loaded images, text files, datasets, etc using the preload() function.
The loadSound() function returns a SoundFile object, and we can use its play() function to play the song whenever we click the mouse:
What happens if we click the mouse multiple times? It sounds like the song object starts playing the file multiple times over itself.
There are two ways we can fix this.
First, we can specify the file’s playMode() to be either restart or untilDone, and that will make it only play one instance of the file, either by starting the song over or not doing anything until it plays until the end:
The other way is to check first if the object is already playing the file and only call play() if it’s not. We can also use isPlaying() to change the background color as an indication of the play state:
Sound Player
Now that we know how to play a sound file, let’s organize our sound player.
We are going to have \(3\) buttons: skip to beginning, play/pause and stop. Our song also has \(3\) states it can be in: PLAYING, PAUSED and STOPPED. The skip to beginning button always resets the song’s playing position, but it doesn’t change what state it’s in. The other buttons make the song change states between PLAYING, PAUSED and STOPPED.
This state diagram specifies the changes related to \(2\) of our buttons:
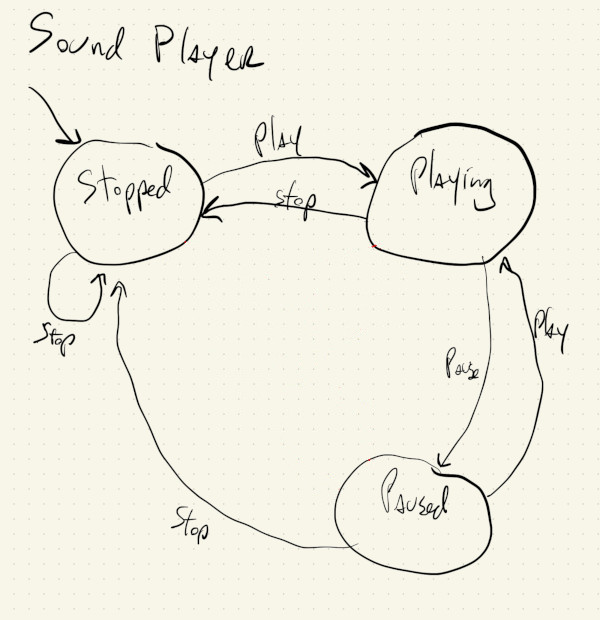
We can read the state diagram by starting with its initial state and considering its transitions.
This state diagram starts at a state called STOPPED, and it transitions to state PLAYING whenever the play button is pressed. If the stop button is pressed, it stays in the STOPPED state.
One it’s in the PLAYING state, pressing the stop button changes the state to STOPPED and pressing the pause button changes it to PAUSED.
Likewise, in the PAUSED state, pressing the stop button changes the state to STOPPED and pressing the play button changes it to PLAYING.
Now we can add what happens when the back button is pressed:
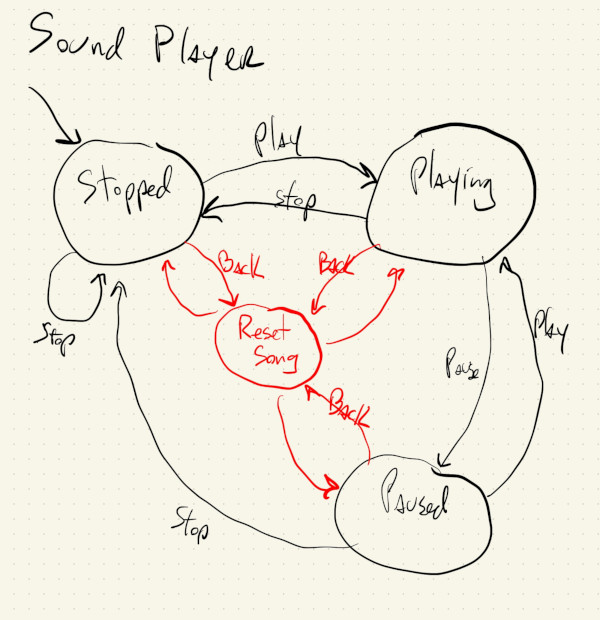
What this diagram is saying is that, no matter what state we’re in, if the back button is pressed, we should reset the song back to its beginning, and stay in whatever state we’re in.
Let’s write some pseudo-code:
We’ll have to double check some things that aren’t so clear from the documentation, like whether the stop() function also resets the tracks position, and what happens if we call jump(0) on a file that is not playing.
Let’s use this code to check:
Some things to note about the code:
- The
jump()function only works if the file is playing, so we had to use an extra global variable to keep track of whether the file should restart after a pause. - The buttons could probably be in a class, since they have the same size and style and right now there’s lots of repeated code.
Let’s make a class for our buttons to encapsulate their style and behavior:
Now, let’s add a fourth button for skipping to the next song, and detect double clicks on the back button to skip to the previous song:
Again, there’s some extra logic that we have to use to set shouldRestart every time we change songs or states while paused.
Seeing Sound
One more last thing, hopefully a fun one.
Let’s visualize the songs while they’re playing.
The p5.js SoundFile object doesn’t seem to have any function or variable that tells us the exact values of the samples that are currently playing. The closest thing it has is a getPeaks() function that gives us a simplified, resampled, version of values for the entire sound file.
The default length of the array returned by getPeaks() is \(5\) times the canvas width, so no matter how long the song is, the length of the peaks array will always be the same. The numbers in this array represent samples, which are like the pixels of sound files. In this case they have been normalized to a range of \([-1, 1]\), where numbers with larger absolute values represent louder samples.
We can use this to map the sample values of the current song from \([-1, 1]\) to values between \([-width, width]\) that we can use to draw some ellipses:
function toWidth(_peakVal) {
  return map(abs(_peakVal), 0, 1, 0, width);
}

waveDiameters = song.getPeaks().map(toWidth);
Since song.getPeaks() returns an array of samples, we can use the JavaScript array special function map() to transform every sample in the array. The toWidth() function that we use to do the actual mapping of each array value uses the p5.js map() function internally. They are both named map(), they both transform numbers from one range of values into another, but they are different functions.
Once we have that array of ellipse diameters, we just have to know which one to draw at each frame. That’s this code here in draw():
let tPos = song.currentTime() / song.duration();
let dIndexDelay = floor(tPos * waveDiameters.length + DELAY);
let dIndex = constrain(dIndexDelay, 0, waveDiameters.length - 1);
let diam = waveDiameters[dIndex];
ellipse(width / 2, height / 2, diam, diam);
The tPos variable uses the song’s currentTime() and duration() functions to determine how far we are along the song that is playing. Its value will always be between \([0, 1]\), and represents the percentage of the track that has been played.
The dIndexDelay variable turns the tPos value into an index value by multiplying the percentage by the length of the diameter array. DELAY is a constant that we added to account for delays between the screen and the computer’s speakers. We can play with that variable in the beginning of the file to shift which index we use at a given frame to account for delays when using bluetooth headphones or speakers.
This value then goes through floor() and constrain() in order to guarantee that we are always using a whole-number integer (no decimal) that is within the array’s bounds.
After that we use it to index into our arrays of diameters and draw an ellipse whose size is proportional to the volume of the current sample being played:
Try it out on both tracks, and remember to adjust the DELAY value to get better synchronization if using bluetooth speakers/earbuds or if the browser is overloaded.