Git and GitHub
Version Control
Along with a good IDE, another tool that is indispensable for working with code is a version control system.
A version control system is crucial when we start working on larger and larger projects with larger and larger teams, but they are very helpful even when we are working alone on homeworks and projects.
They prevent us from ending up in this situation:
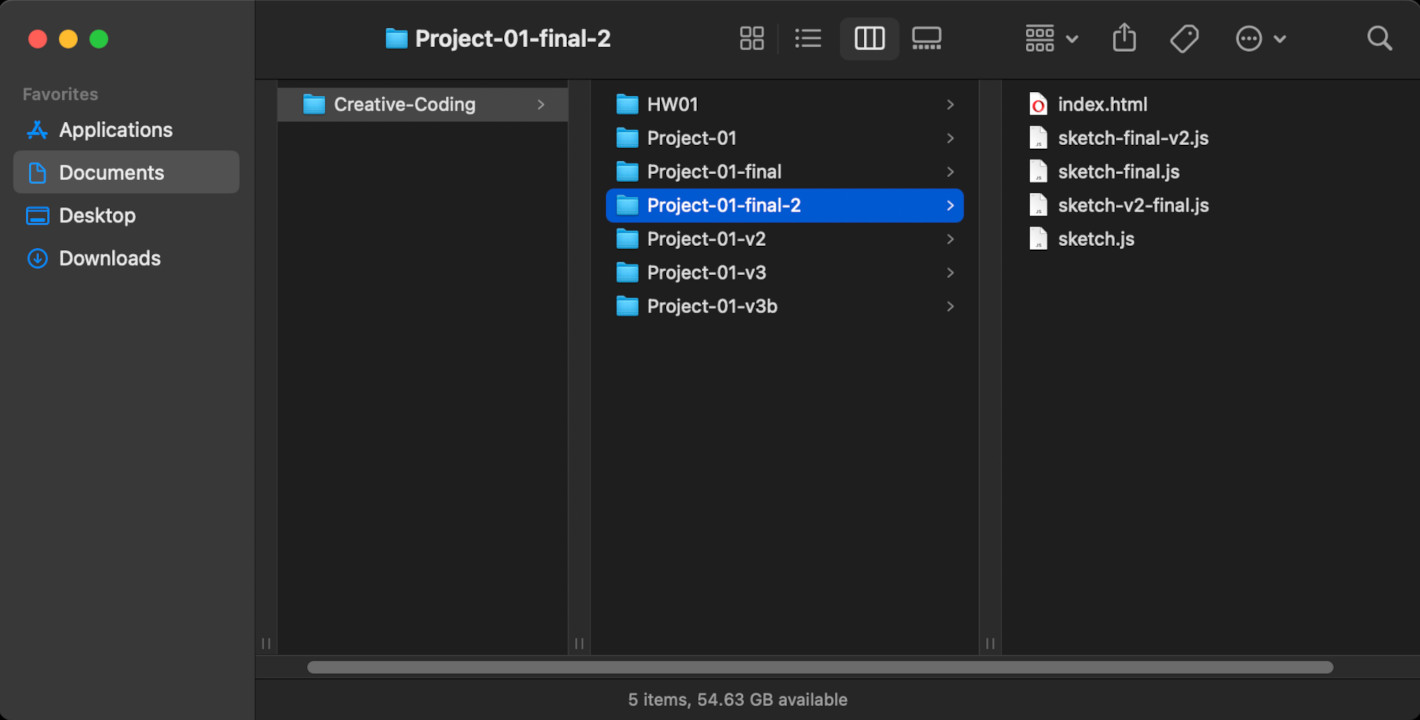
They do this by keeping track of all of the changes in our files, and providing mechanisms for us to go back in time to any version of our code that was saved in its history.
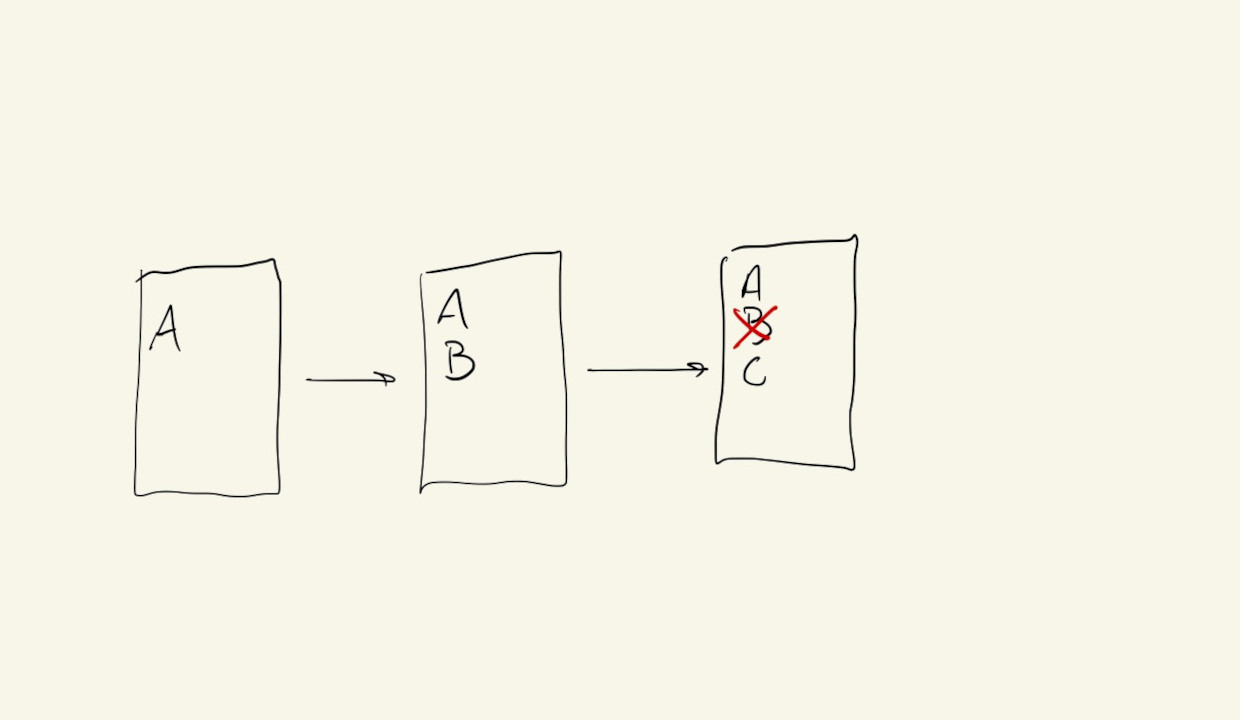
It gives us another level of saving for our files. One that not only allows us to later see what was added, removed or modified in each of our files, but also when, and by whom. It also has ways of letting us group changes that we make in different files, so we can better track how different parts of a project are related.
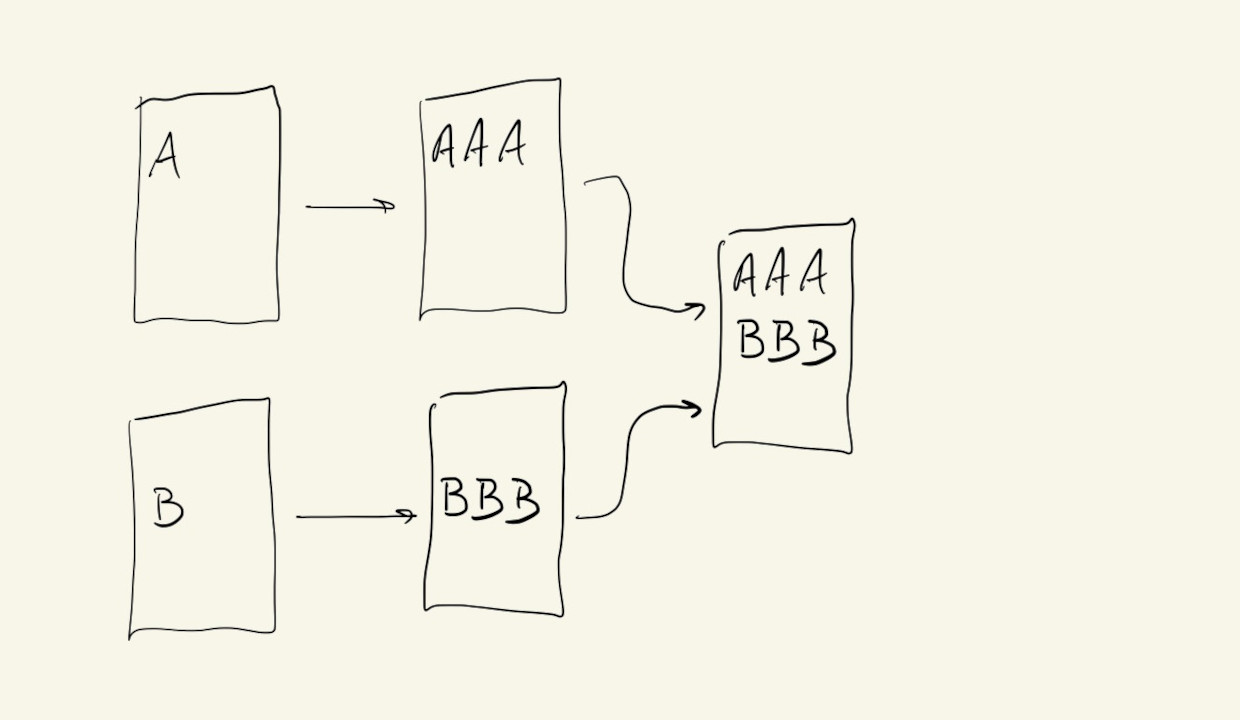
We can definitely use a version control system by ourselves to keep track of our changes on our files, but if we’re working on a project with someone else who is also using a version control system on their computer, we can use version control to synchronize the changes that we make on the shared files.
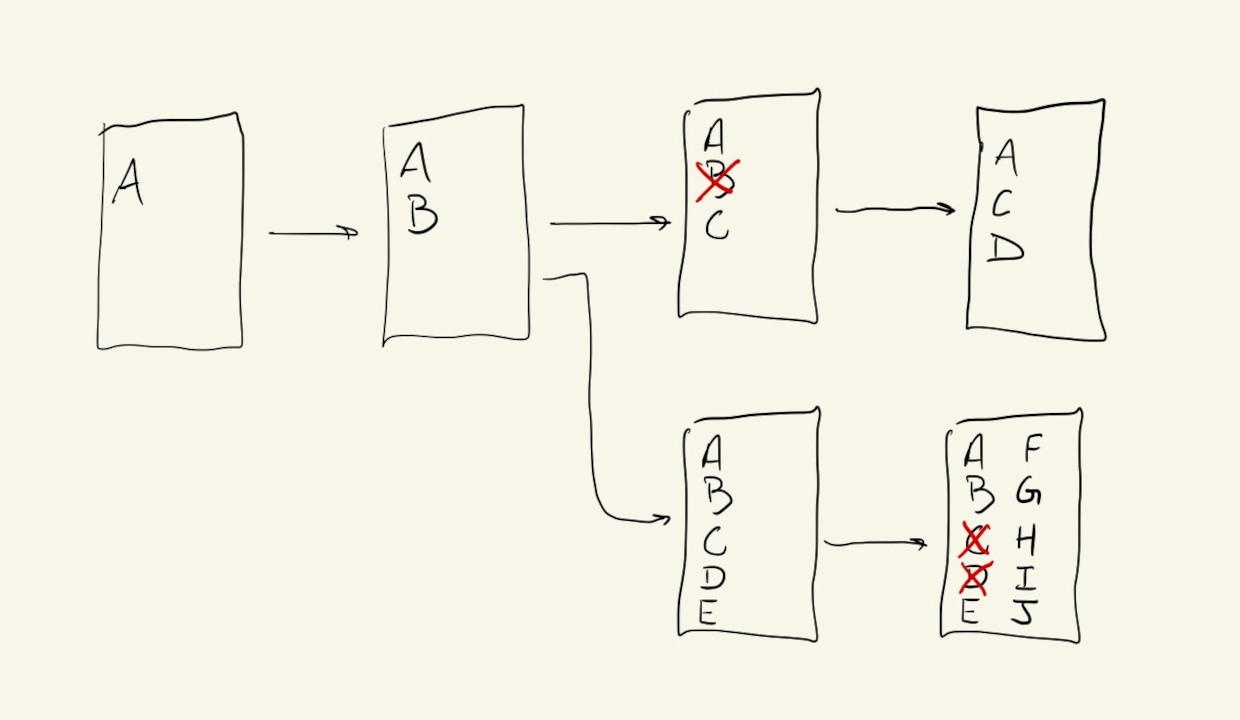
A version control system also helps us track different versions of our code. Not only can we always go back to some point in the past history of our code, we can also branch our history and keep parallel versions of our files.
This can be very useful when we’re experimenting and testing different strategies and methods for implementing an algorithm or procedure. A version control system will help us switch between these versions without losing any information.
Git
The most popular, robust, social and featureful version control system today is called git:

It’s what most companies, teams and individuals use, not only for code, but more and more often, for many kinds of text-based files. It’s popularity is probably not unrelated to the popularity of GitHub, the cloud-based, social-network/hosting-service web platform for git projects, but we’ll get to GitHub next.
Let’s start by looking at just git, the version control software, as it runs on our local machines.
Most Macs and Linux computers come with a version of git installed. For computers that don’t have git, it can be downloaded and installed from the official git website. This is the classic method of installing git, which allows us to use it through text commands in a terminal, without a graphical user interface.
The easiest way to install, and easiest way to get started with git, is by using the GitHub Desktop App. And since we will eventually want to upload our projects to the web, this is also the easiest way to connect our local project files to the GitHub service.
This video quickly goes over how to download and install the App on a Mac:
Basic Workflow
Now that we have git installed, let’s go over how to set up and use it in a project.
First, let’s use our computer’s file manager to create an empty directory for our project, and then let’s add this directory to our IDE:
Next, let’s add two files to our project, one called index.html and another called sketch.js, and start working on our project:
The exact content of these files is not very important right now. We just want something we can add to version control. We could just as well have started with some project that we already had in our computer.
Now, let’s switch to the GitHub app to initialize our repository. Repository is just a fancy word for our folder/directory/project once it gets added to version control. One thing to note: when selecting the Local Path for our repository we want to select the parent directory of our existing project and NOT our project’s directory. In our example we selected the Creative-Coding folder and not the HW01 folder.
Once the app initializes our repository it also automatically adds and commits both of our files (index.html and sketch.js) to the version control history. A commit is a set of changes that get recorded permanently in our repository’s history.
If we select the commit and look at the content of the files, all of their lines will be shaded green, meaning those were new lines added to our repository history:
If we now make changes to our files, we’ll see that both our IDE and the GitHub App notice those changes. The IDE will add vertical marks along the side of the modified lines of our code, and the GitHub App will list our file and highlight its modifications, under the Changes tab.
It again highlights in green the lines that have been added, and now it also highlights in red the empty line that was “removed” when we added the new code.
We can add these changes to our repository’s permanent history by writing a little note with the description of the changes in the textbox towards the bottom-left of the app, and hitting the Commit to main button.
If we now check the history we’ll see that we have a new commit, that shows exactly what we changed:
If we make a mistake and create a commit before we meant to, or if we accidentally add the wrong code to a commit, we can always undo the last commit. This will restore our code to whatever it was right before the commit, allowing us to go back into our IDE to fix anything before updating the commit message (if necessary) and re-committing:
Branches
Let’s see how to create parallel branches of our project to experiment and test different versions of our code.
We’ll start with a common base commit where we are using black background and white fills in our project:
Now’s let’s create a branch of our project where we can experiment with different colors.

We’ll call the new branch bright-colors. Once created, all of the history from the main branch up until this point will be copied into the new branch, but from this point forward they will most likely have different commit histories. Once we’re in the new branch, any changes we commit will only be added to this branch’s history:
We can have many parallel branches, starting from the same base commit, or we can branch from branches.
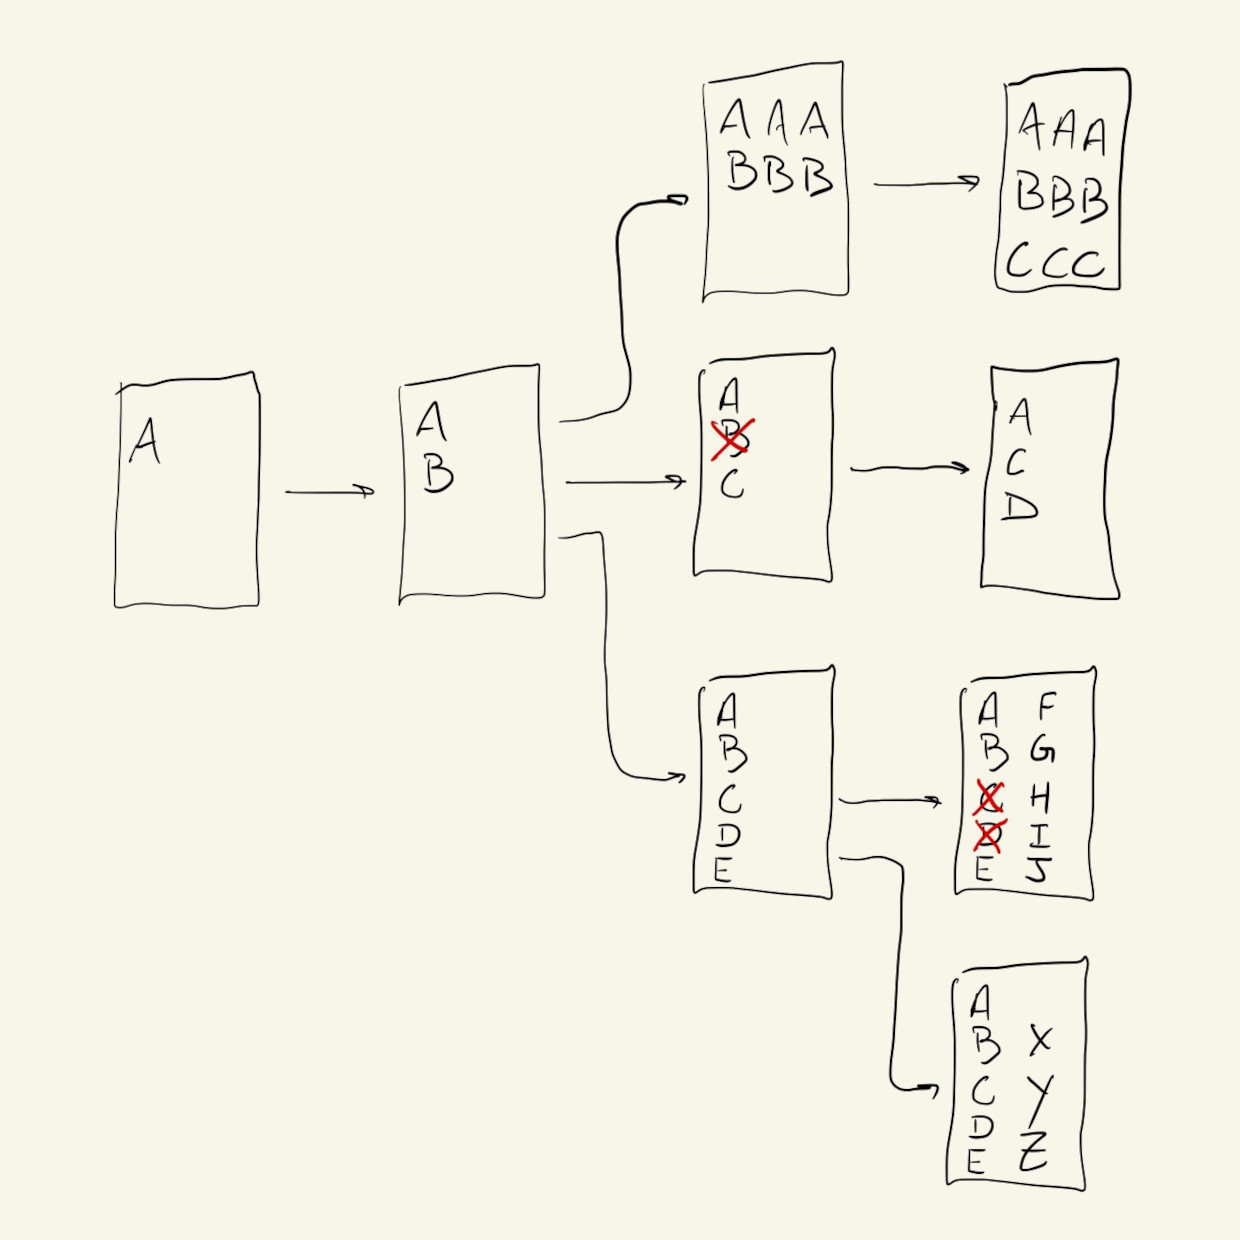
In our example, let’s go back to our main branch and create a third branch called pastel-colors to experiment with another color palette. The workflow is the same as before: create the branch, change the code, commit to the new history:
We now have access to all three versions of our code. Nothing was lost, we don’t have to give our files funny names, and all of the changes are documented in our commit histories.
Branching can also be useful when adding features or making extensive and complex changes to a large codebase because they create a separate space where we can easily track our progress and make sure we’re not changing parts of the code that are not related to our task.
Either way, after we’ve implemented some new features or experimented with multiple options for our project, we can merge one branch into another, basically combining their histories into one common history.
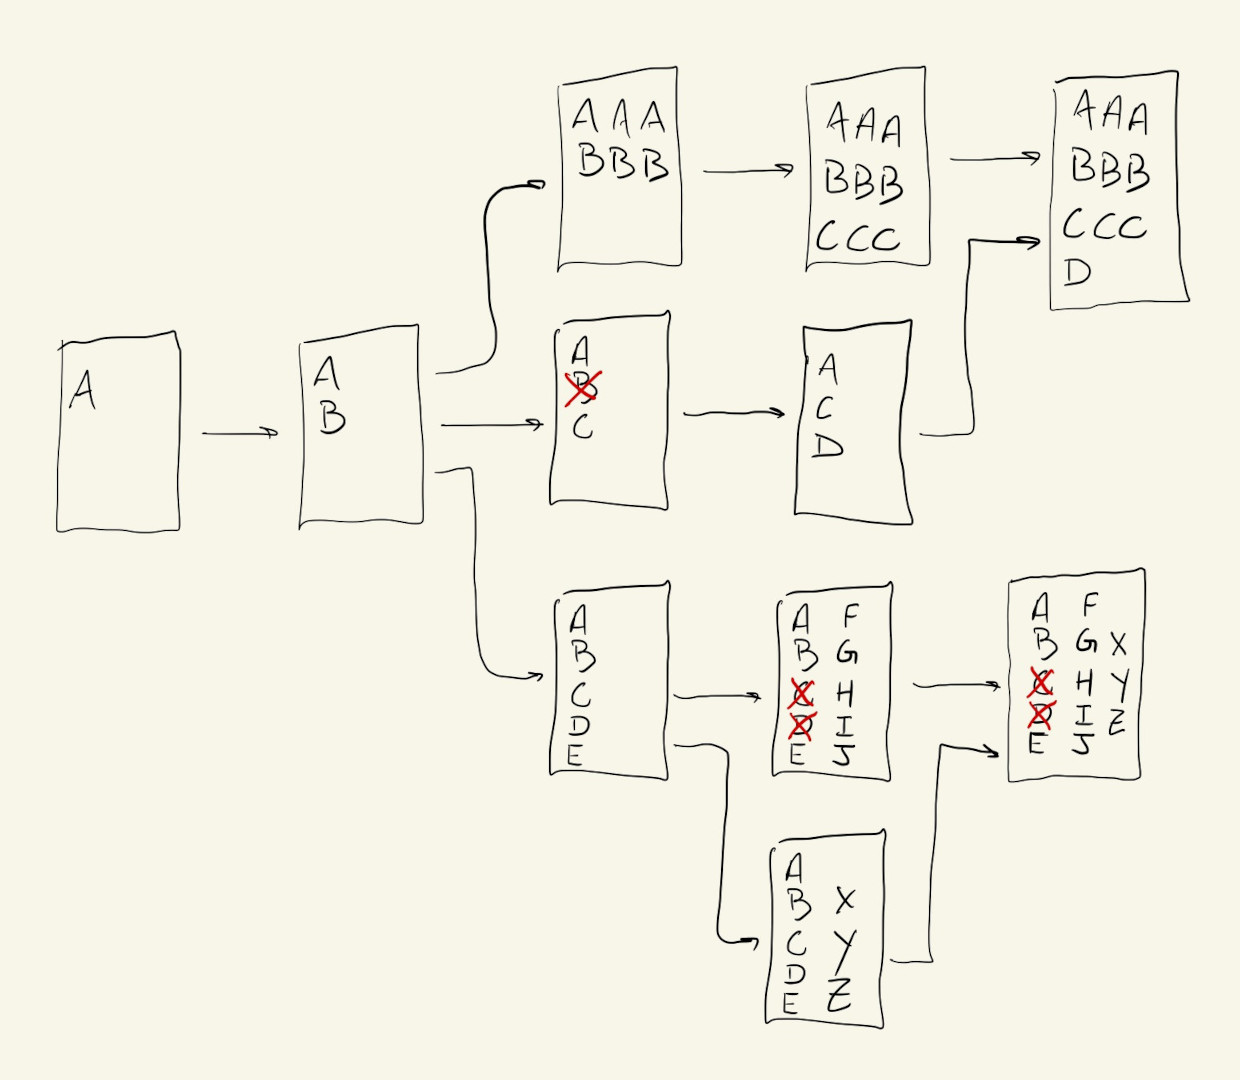
In our example, after we explore and test our three color palettes, lets say we decide that the bright-colors palette is actually the best and we want that to become the main version of our code. We just have to use the merge option to bring the changes from bright-colors into main:
Conflicts
When the histories between two branches diverge by too much, or when the exact same lines of code are changed in different branches, there could be conflicts that prevent a merge because git won’t know how to automatically combine those changes.
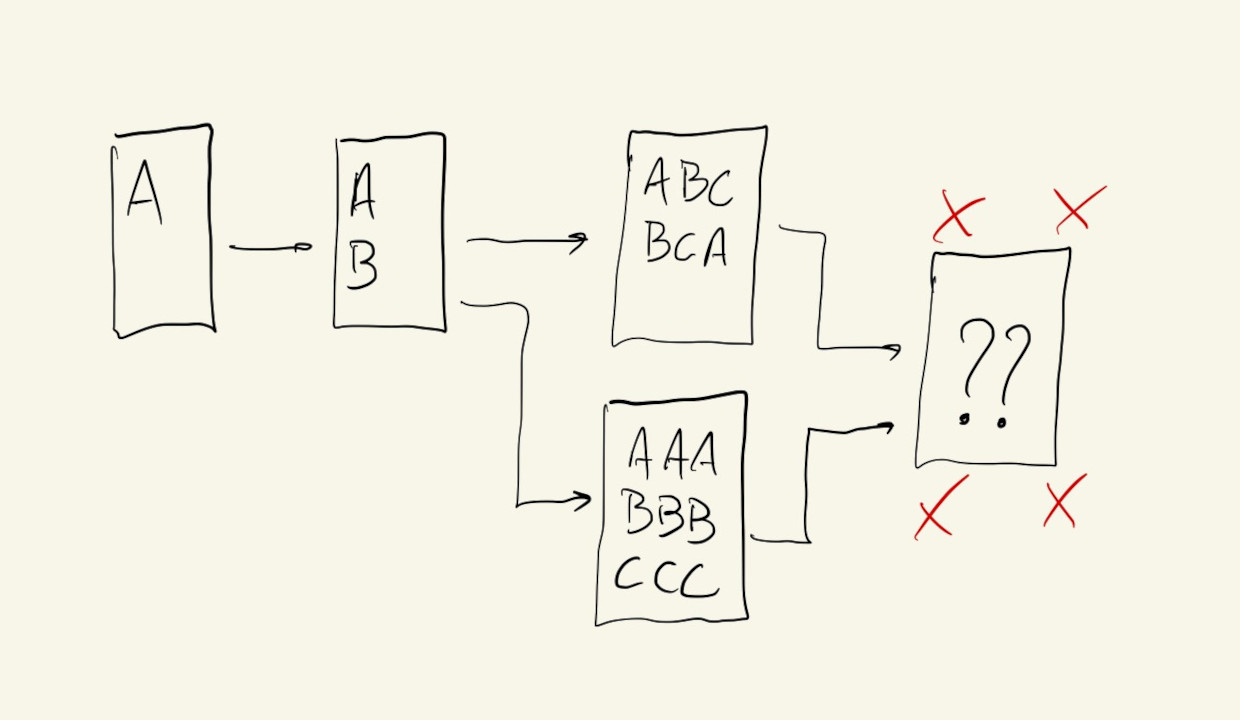
Conflicts are more common when working with other people, but they can happen between branches when working alone.
In our example, if we try to merge the pastel-colors branch into main after we’ve merged bright-colors we’ll get a conflict because those two branches changed the exact same lines of code. In this situation, git will stop the merge and ask us to resolve the conflict before it can continue. Our IDE has a nice built-in interface for selecting which of the sets of changes we want to keep. After that, we go back to the GitHub app and finish the merge:
Git Review
Repository: our project. The set of files under version control and their change history.Commit: A single point in our history, made up of related changes and a descriptive message.History: Collection of commits.Branch: A separate version of the repository with its own history. Useful for tracking and testing different versions of our code or for implementing large complex changes separately from the main version of the code.Merge: Combine the histories of two branches.
GitHub
We’ve been looking at how to use git locally on our computer, and on our own. Another benefit of version control software is that it allows us to easily collaborate with others by sharing our project files.
We can probably already imagine how a system that keeps multiple versions of our files and tracks their entire change history can be useful when working with others. We just need a way to connect our local repository to other people’s repositories.
And this is exactly what GitHub does.
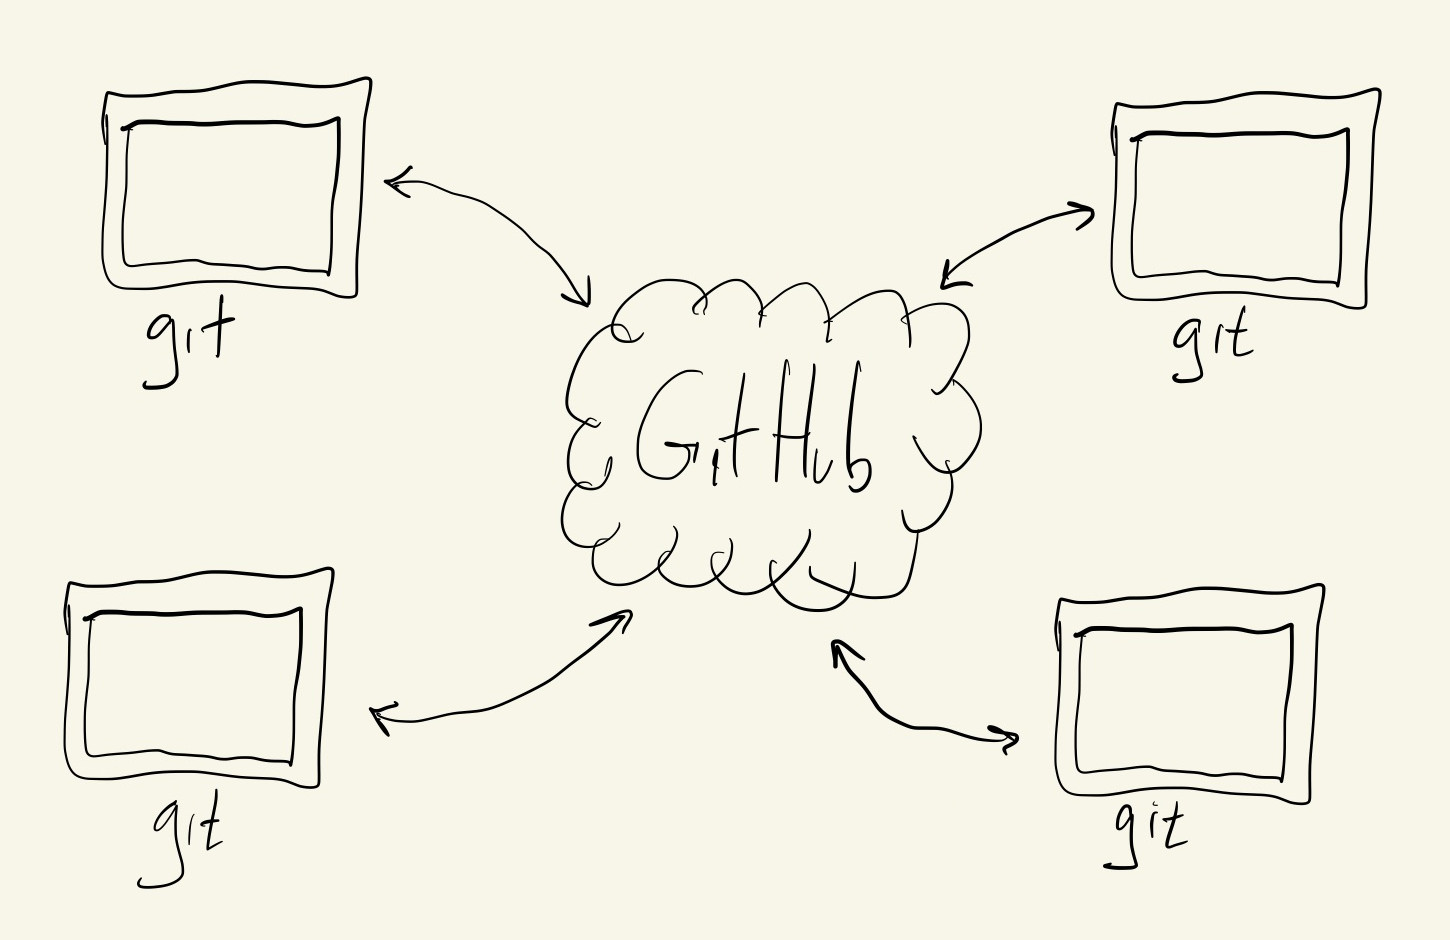
GitHub is one of a few online repository hosting services. Other services include GitLab.com, Bitbucket and CodeCommit, but GitHub is by far the most full-featured, commonly used and easiest to get started with. And, as we’ll see, git makes it easy for us to actually use multiple remote services at the same time if we want to:
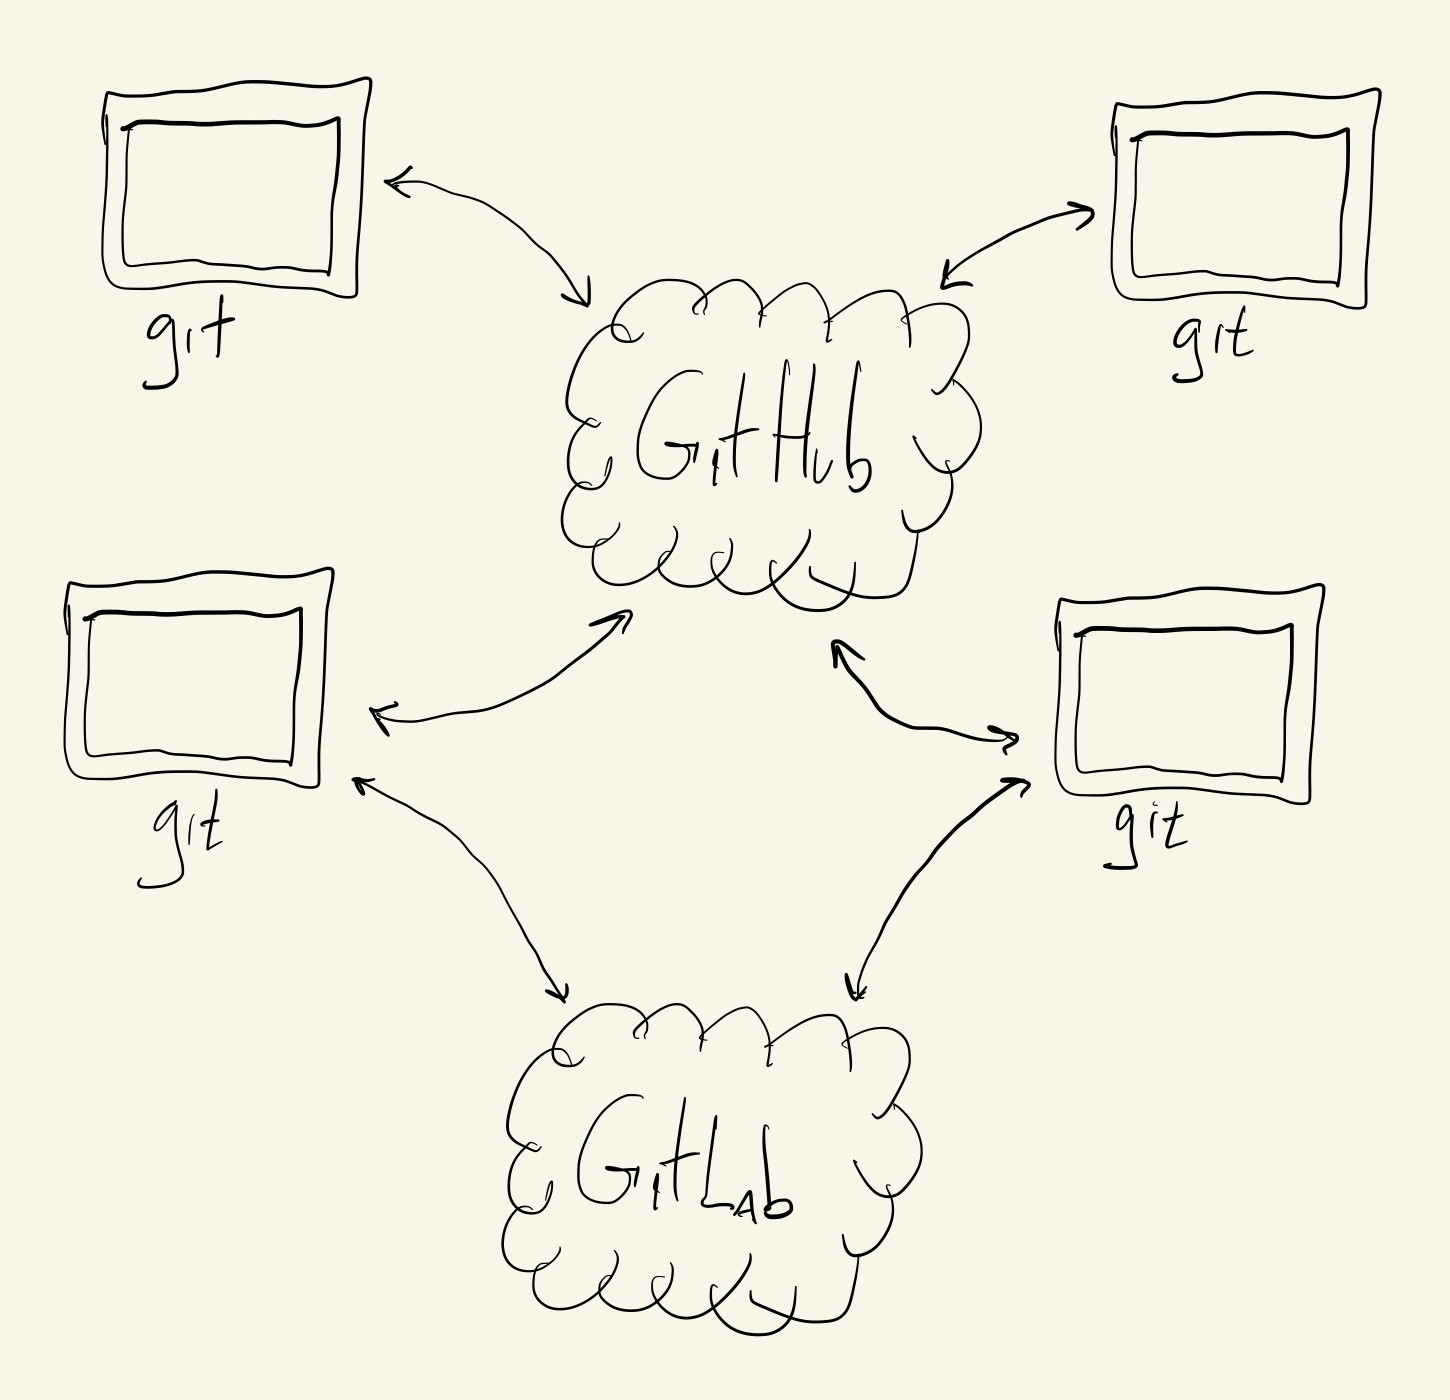
Before we can host our repository on GitHub we need to create a GitHub account.
Now, we can ask the GitHub App to publish our repository on GitHub. It’s going to ask us to allow the GitHub app to access our GitHub account, and after some clicking around we’ll see our repository online:
Basic GitHub Workflow
The workflow for working in a shared repo is very similar.
The major difference is that every time we sit down to work on our project, before we write any new code, we should always fetch and pull the current version of our remote repository. This brings in any changes made by other people, which we can see if we look at the project’s commit history. These are actually two separate actions: first, fetch looks at the remote repository and lets us know if our local copy is different from the remote copy, and how. If there are new commits in the remote repository, we can choose to pull and incorporate them into our local history.
Conversely, once we’re flowing and writing code, changing files and committing to our local repository, we should also always remember to push our local changes to the remote repository. This way other people can have access to our latest version of the project. We just have to remember that first we commit locally, then, after some number of local commits, we send all of the new changes to the remote repository with one push.
Smart GitHub Workflow
Even though git is keeping track of our shared history and allowing us to go back to any commit from our past, now that we’re potentially collaborating with hundreds of people on our projects, the chances for merge conflicts and other types of confusion is pretty high.
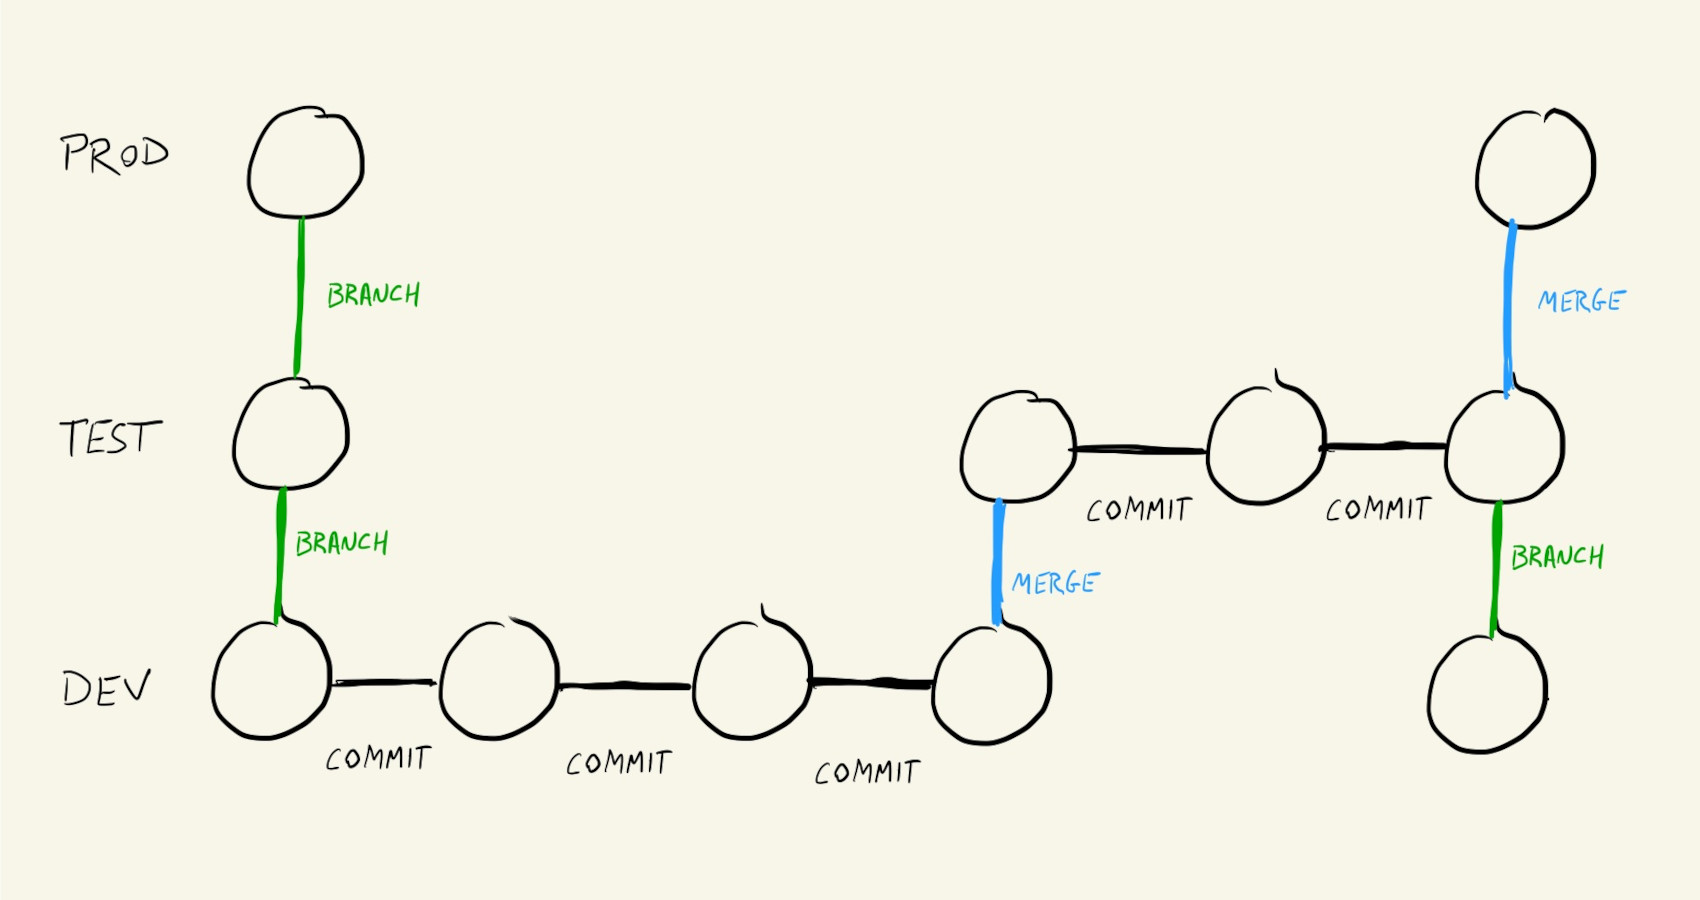
One strategy to avoid breaking the whole project with a bad commit, or even just unintentionally overwriting other people’s code, is to keep a set of branches for different stages of our project.
We could have a production branch, with code that always works. This is code that people who don’t work on our project can download and use. Or, this could be the code for a live website.
We can also have a dev branch, where everyone merges their code as they work on different features and additions to the project. This code doesn’t always work. It can have partially implemented features, things that haven’t been tested, placeholders, etc, but this branch is important because it’s where major conflicts get resolved.
And between the production and dev branches we can have a test or staging branch, which contains code that is almost ready to go to production, but has to be tested or integrated with other services first.
And now we always work in the dev branch. Code, save, commit, code, save, commit, push, code, commit, push… etc etc etc.
Every once in a while dev gets merged into test, the code is tested, errors are fixed, and, eventually test gets merged into prod, and any changes made directly to test get branched into dev.
Pull Requests
In addition to some of these pre-determined shared branches, it’s also a good idea to use a separate, personal, feature branch for implementing any big changes to the project. This way we know exactly what the shared code and history were when we started making our changes, and we don’t have to worry about resolving any conflicts as we work on our big changes.
Once we are done implementing our awesome feature, we’ll pull any changes from the remote dev branch into our feature branch, merge and fix any conflicts there, and then we are ready to merge our changes into dev and push that back out to the remote repository.
But we’ll do something different. Instead of merging our changes directly into dev, we’ll push our feature branch to the remote repository and start a pull request.
We can think of a pull request as a collaborative merge. We choose which branches we want to merge and GitHub gives us an interface where the whole team can check for potential problems, discuss any issues with the code, give feedback, etc.
Once people are happy with the proposed changes, someone merges our feature branch pull request into the shared dev branch.
This might seem like a whole lot of clicking, but for big projects with large teams, it’s important to have some strategies like this to keep all versions of our code organized and our project working.
GitHub Review
Remote: The shared copy of our repository that is hosted online.Fetch: Get a list of potential changes from the remote repository.Pull: Merge changes from the remote repository into our local repository.Push: Merge changes from our local repository into the shared remote repository.Pull Request: A merge proposal.