Sound Processing
NOTE:
To use the sound library, we have to include the p5.sound library in our project’s index.html file after the p5.js file, like this:
<script src="https://cdn.jsdelivr.net/npm/p5@1.7.0/lib/p5.js"></script>
<script src="https://cdn.jsdelivr.net/npm/p5@1.7.0/lib/addons/p5.sound.js"></script>
Inputs & Outputs
We’ve already looked at how to use the p5.sound library to play pre-recorded sounds from files, now, let’s look at how to use other parts of the library to manipulate recorded or live audio.
The p5.sound library, along with many other creative coding audio processing toolkits, was designed to somewhat mimic a physical audio processing setup. Objects have input and output ports that receive/send the same kind of information (digital audio samples); each module does some kind of processing or manipulation on its inputs before sending them to its outputs; and modules can easily be chained together to create more complex sound effects.
There are special objects that allow us to grab live audio from our computer’s input ports (microphone, line-in), and other objects that allow us to send our processed audio to our computer’s outputs (speakers, line-out).
There are also “display” objects that don’t output any sound signal, but are used to obtain specific information about our audio signals, which we can then use to analyze our audio visually.
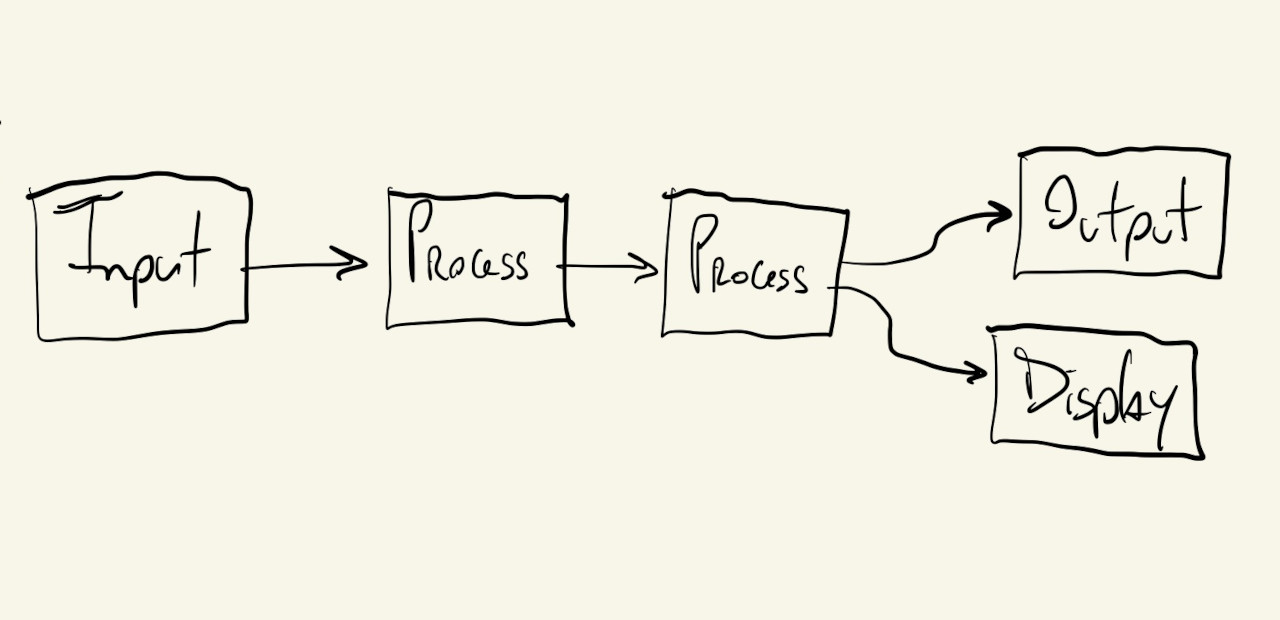
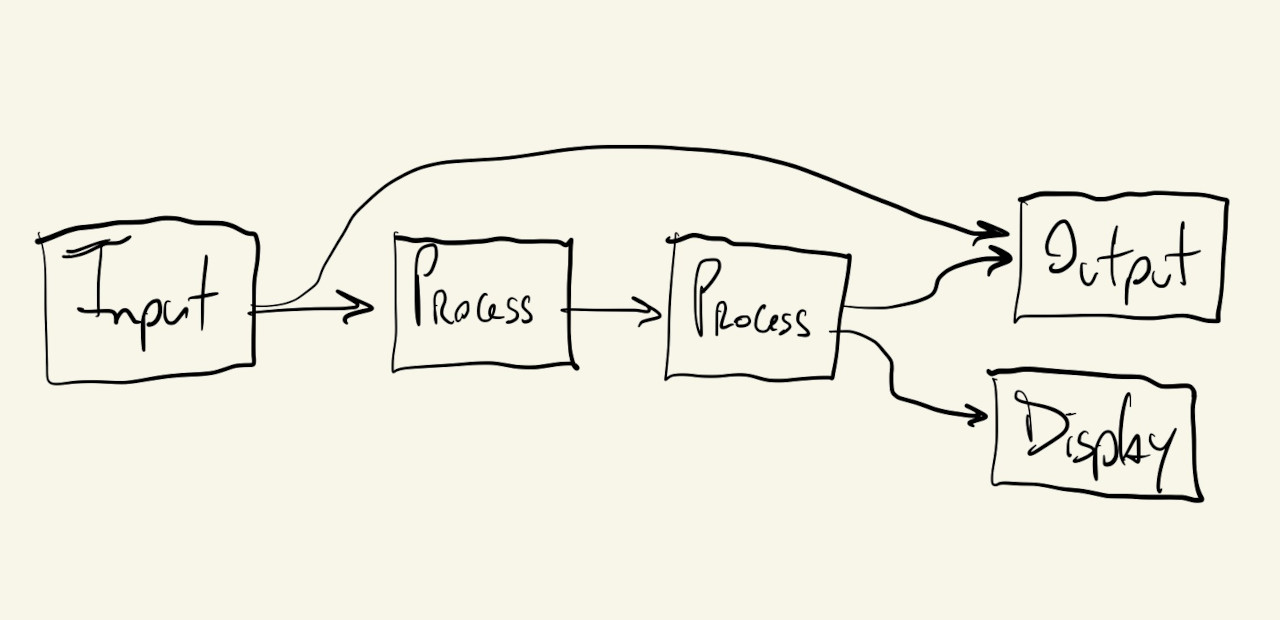
The outputs from these objects/modules can be routed to many inputs, and some modules can receive multiple inputs:
Let’s start by looking at one of the simpler modules.
Amplitude
Amplitude. is one of the “display” modules that don’t output audio, but instead can be used to show information about our signal.
In this case, the Amplitude module will give us an audio signal’s amplitude (how loud it is), as a number between \(0\) and \(1\):
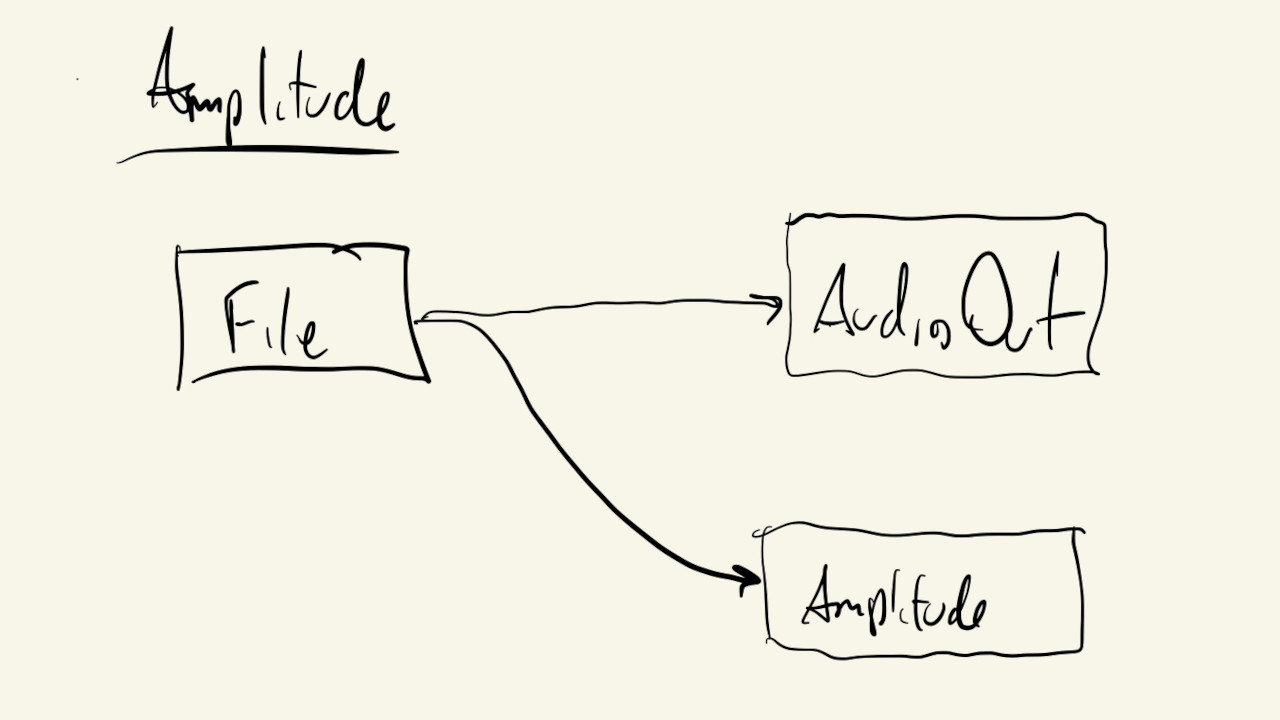
By default, any p5.SoundFile object we create will send its output to the p5.soundOut module/object, which is our final output: the signal that goes to our speaker.
And, also by default, the Amplitude module gets its input from this same p5.soundOut object.
So, technically, instantiating these two objects like this, would be enough to have them connected properly:
mSound = loadSound("./sound-file.mp3");
mAmp = new p5.Amplitude();
But, it’s not a bad idea to practice how to make these connections ourselves. This will avoid unexpected behavior and unnecessary debugging once our audio processing pipelines start getting more complex.
We can use the following code to manually re-route the signal from our p5.SoundFile object to both the p5.soundOut object and a p5.Amplitude module:
mSound.disconnect();
mSound.connect(p5.soundOut);
mSound.connect(mAmp);
These are the exact connections shown in the diagram above.
Our p5.Amplitude object can now be used at every iteration of our draw() function to get the sound’s amplitude and display it visually using ellipses:
Filters
Now that we can visualize our sound, let’s add an actual processing module to manipulate the quality and characteristics of our audio:

The p5.Filter module allows us to filter our audio signals based on frequencies.
Some common types of filter that we can implement with this module are: lowpass, highpass, bandpass and notch.
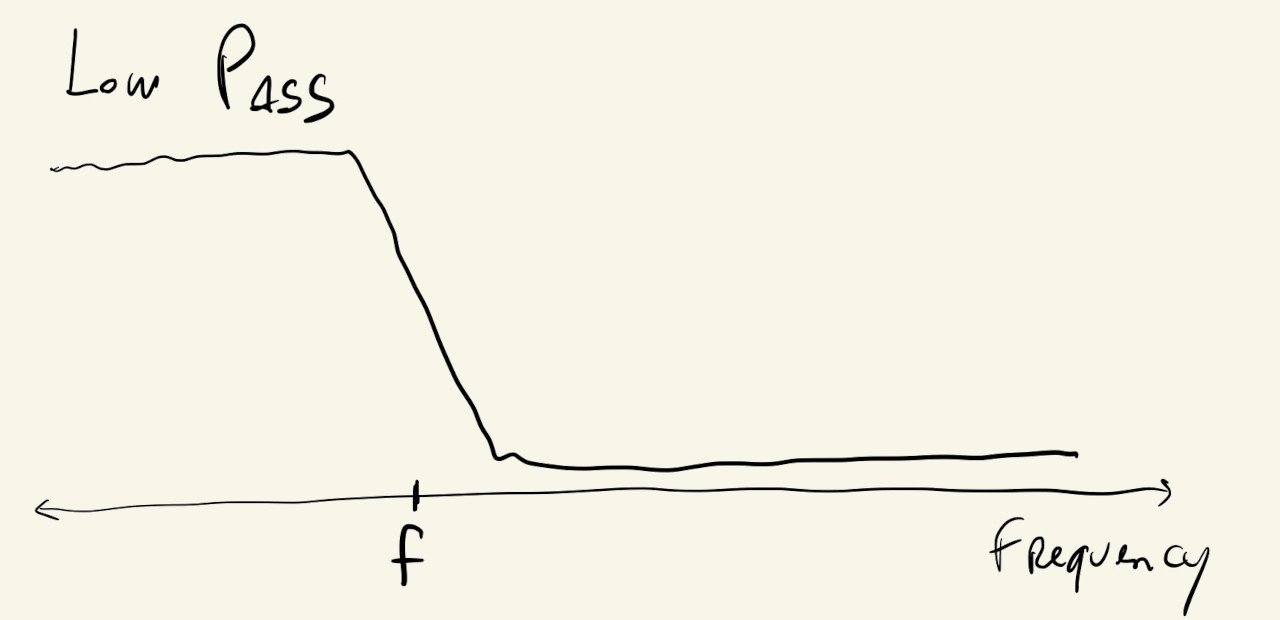
Like the name suggests, the lowpass filter lets low frequencies (bass) through while blocking high frequencies:
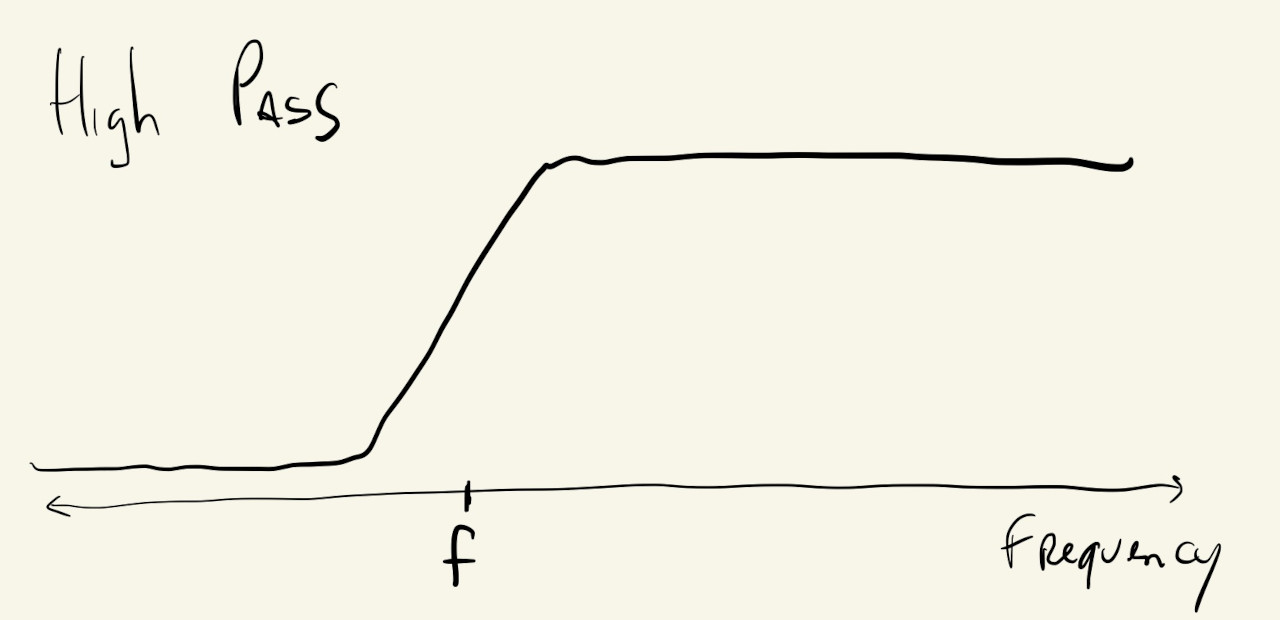
The highpass acts in the opposite manner, filtering out low-frequency components of the sound, while letting high frequencies pass to the output:
The notch filter is used to attenuate a specific range of frequencies from the audio signal, while the bandpass does the opposite and only lets a specific range of frequencies pass to its output:
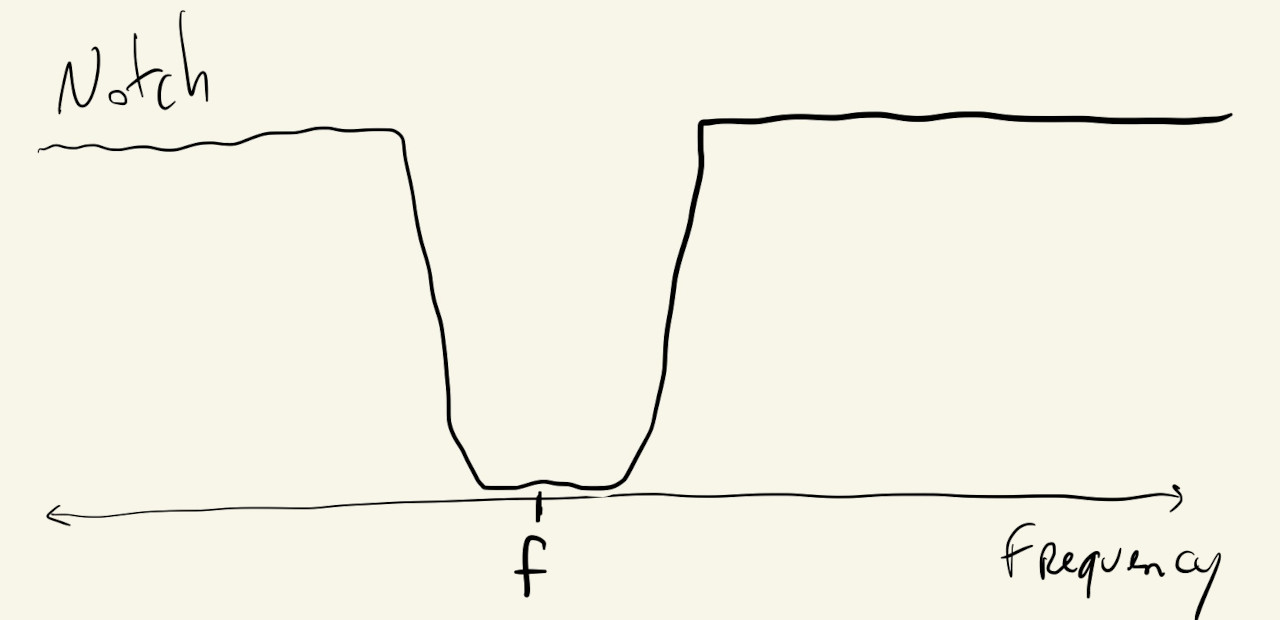
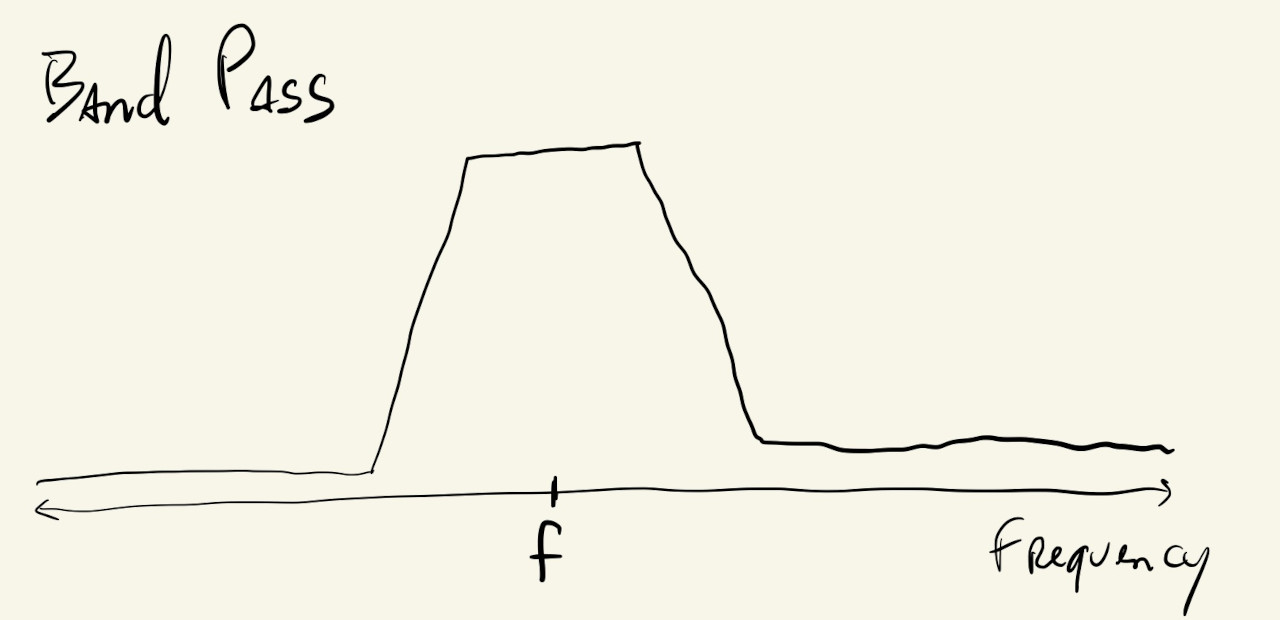
The frequency \(f\), sometimes called the cutoff frequency, corner frequency or break frequency, is a parameter to the filter object and will determine which frequencies pass and which will be filtered out. The bandpass and notch filters also have another parameter to control their bandwidth, or how wide their cutoff or pass bands are.
With this in mind, we can instantiate a filter and implement the following system:
With something like this:
mSound = loadSound("./sound-file.mp3");
mFilter = new p5.Filter("bandpass");
mAmp = new p5.Amplitude();

mSound.disconnect();
mFilter.disconnect();

mSound.connect(mFilter);
mFilter.connect(p5.soundOut);
mFilter.connect(mAmp);
And use mouseX to pick the filter’s center frequency \(f\):
FFT
We can definitely hear the differences in the sound as we move the mouse around and change the filter’s cutoff frequency, but let’s look at a module that will let us visualize the filter’s effect as well.
The p5.FFT class implements the Fast Fourier Transform algorithm, which can be used to separate our audio signal into individual frequency components.
We can replace the Amplitude module in the last example with the FFT module:
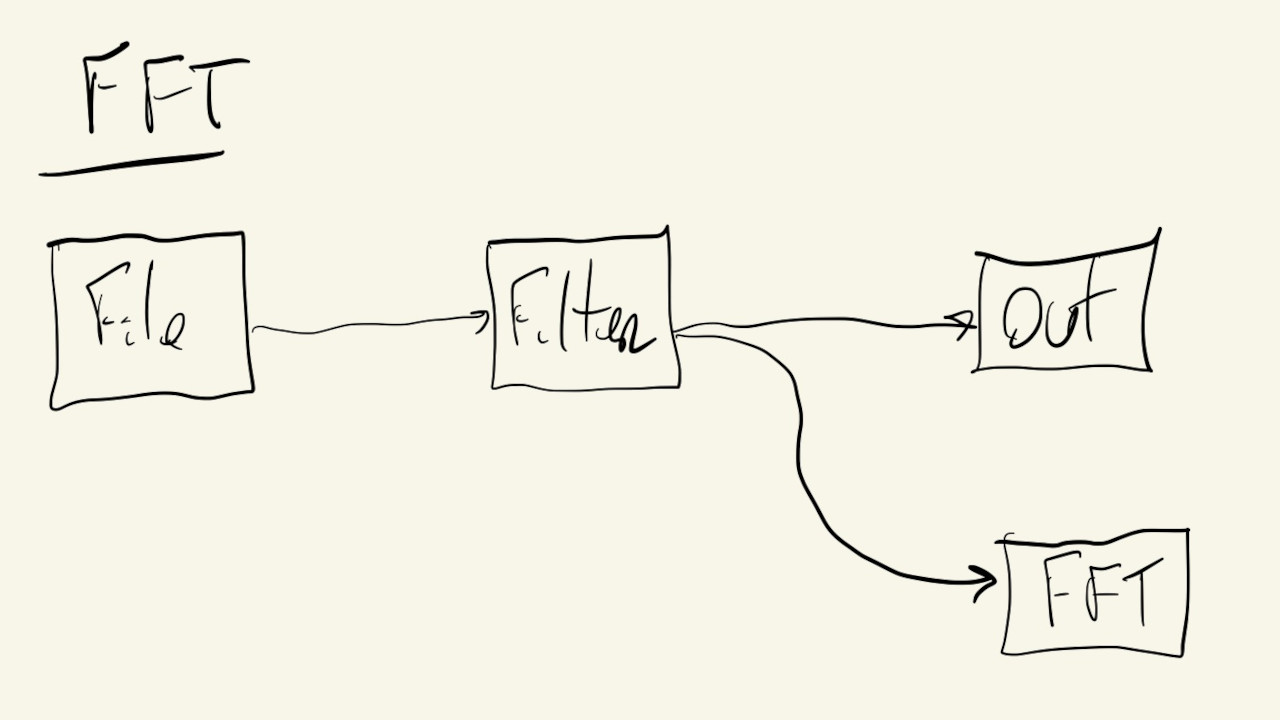
And now, when we call FFT.analyze(), this module calculates an array of \(1024\) values, where each value corresponds to how much of a particular audible frequency was present in the original audio signal.
So, the first value of the array corresponds to frequencies between \(0\) and \(20\) Hz, the second value is for frequencies between \(20\) and \(40\) Hz, and so on, all the way to the 1024th value that corresponds to frequencies greater than \(22,000\) Hz or \(22\) kHz.
If the value in a particular position is \(0\), that means the original audio signal had no sound in that frequency. On the other hand, if it’s \(255\), it means that the original signal had a very strong sound with that frequency.
The p5.FFT object also has a getEnergy() function that returns the amount of a specific frequency or frequency range present in the audio signal. It can also be called with one of five pre-defined range strings, to get the amount of energy in the bass, lowMid, mid, highMid and treble frequency ranges.
Knowing this, we can use the p5.FFT object and the FFT.analyze() and getEnergy() functions to visualize the effects of the filter from the previous example:
Instead of just drawing one circle, we now draw five, one for each of the predefined frequency ranges, and as we move the mouse from the left to the right we will see movement go from the bottom circles to the top, which correspond to the higher frequency ranges.
Let’s experiment with another effect module/object
Delay
The p5.Delay module adds a kind of echo effect to any sound by replaying the audio signal again after a couple of milliseconds and then replaying again delayed by a couple more milliseconds, and so on and so on… to create a trail of sound, where each delayed copy is also attenuated (lower volume) by some amount.
We can just replace the p5.Filter module in the examples above with a p5.Delay object like this:
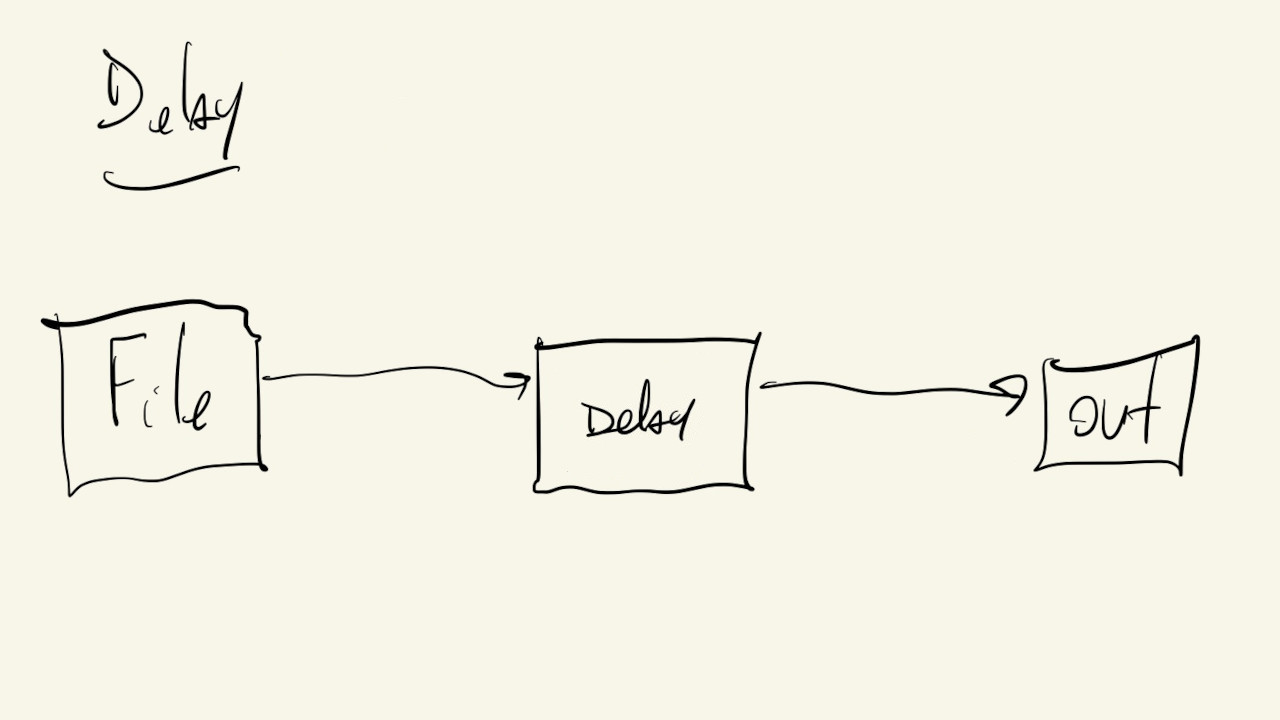
And initialize the object with a proper delayTime():
mDelay = new p5.Delay();
mDelay.delayTime(0.15);
But, no matter how we adjust this parameter, the resulting signal just won’t sound like a natural echo. Try it :
This is because all we are hearing is the “wet” sound, the sound with the delay, where in a real-world situation any kind of echo is a combination of the delayed sound (“wet” signal) with the original sound (“dry” signal).
To simulate this, we have to wire up our sound processing modules like this:
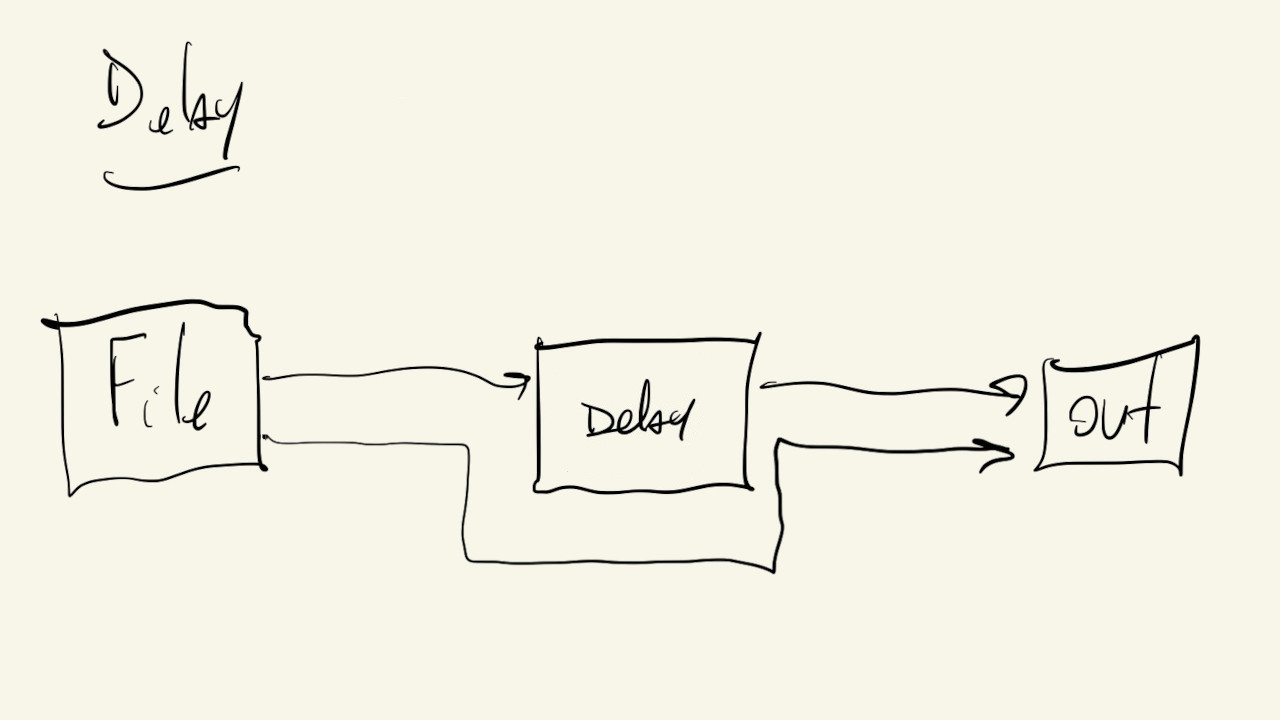
Where the output gets a mix of the original sound plus the delayed sound:
mSound.amp(0.7);
mDelay.amp(0.3);

mSound.connect(mDelay);
mSound.connect(p5.soundOut);
mDelay.connect(p5.soundOut);
Now we can play with the parameters to adjust the delay and we’ll have a little bit more control of how the overall final signal will sound.
Reverb
Another module that is very similar to the p5.Delay, gets connected the same way, and is used in a similar manner, is the p5.Reverb effect.
Reverb also adds echo to a sound, but instead of adding one delayed version of the signal, as if it was coming from the same location as the original source, reverb is like adding a bunch of delayed versions of the original source, but all coming from different locations. This has the overall effect of making the sound feel like it is occurring in a physical space with particular audio characteristics.
This video explains and shows the difference between delay and reverb on vocal and instrumental sounds:
In p5js, if we wire it up to hear just the reverb, like this:
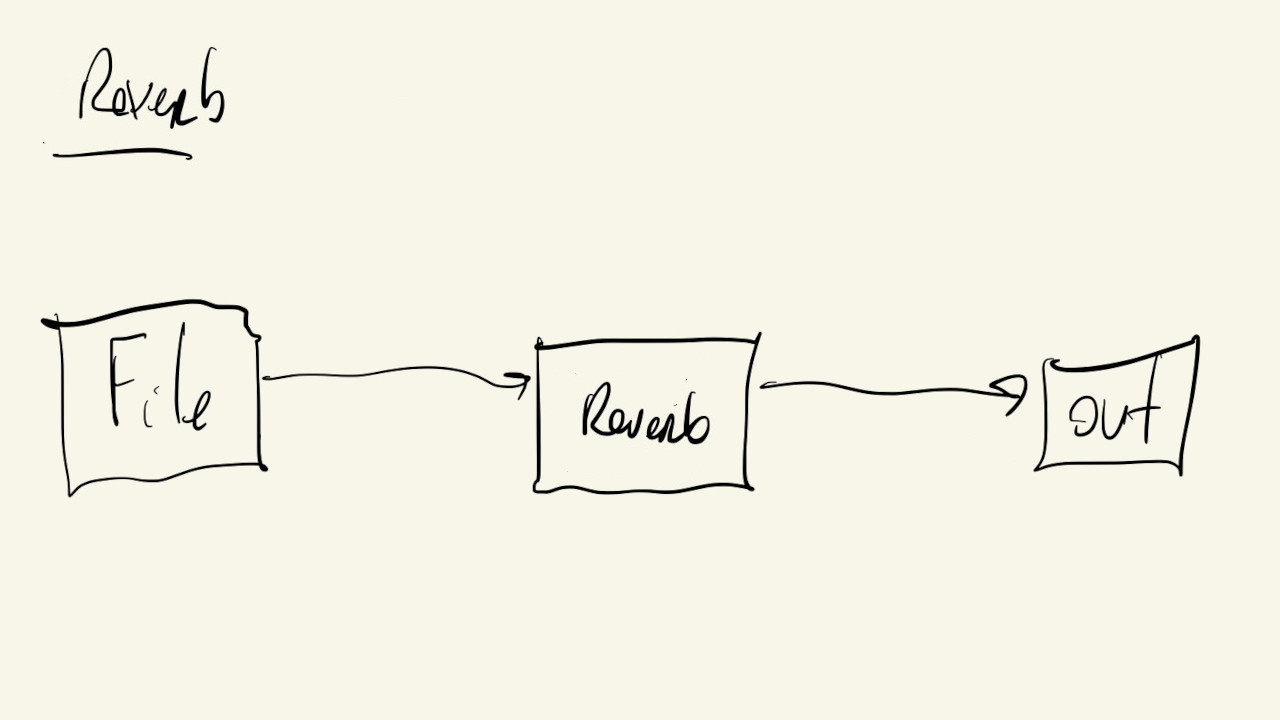
the wet signal will sound like this:
But, like the delay, if we wire it up like this, mixing the wet and dry signals:
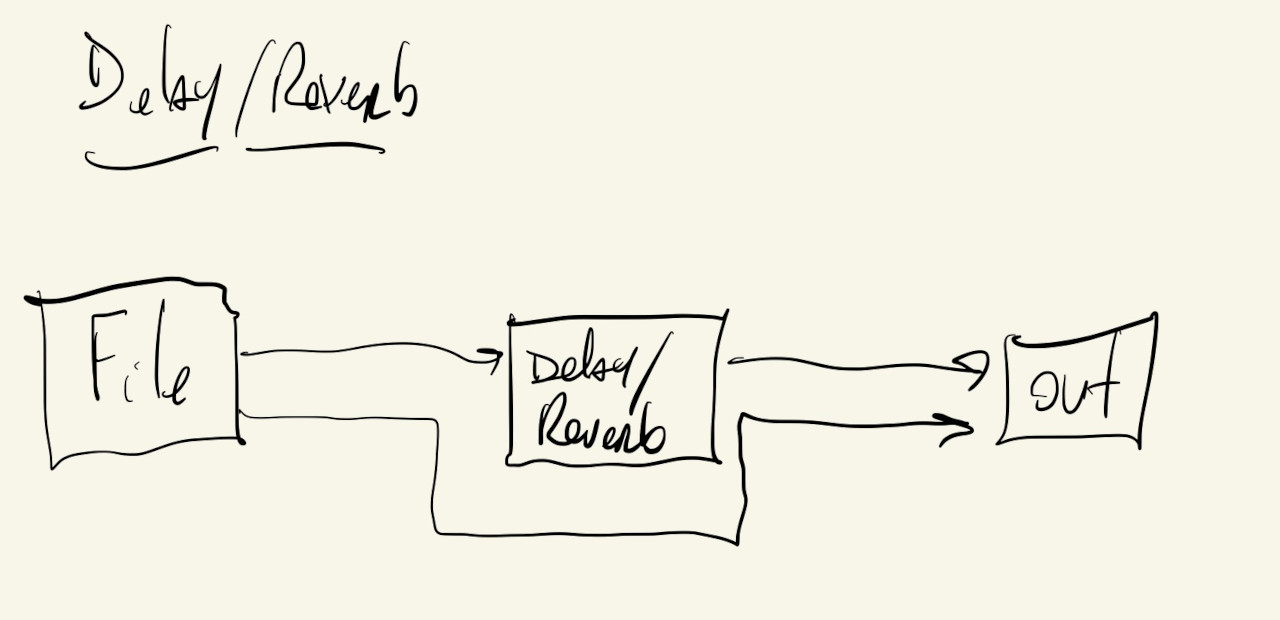
and adjust some of the parameters, we can get it to make the original signals sound like it’s coming from a large empty room:
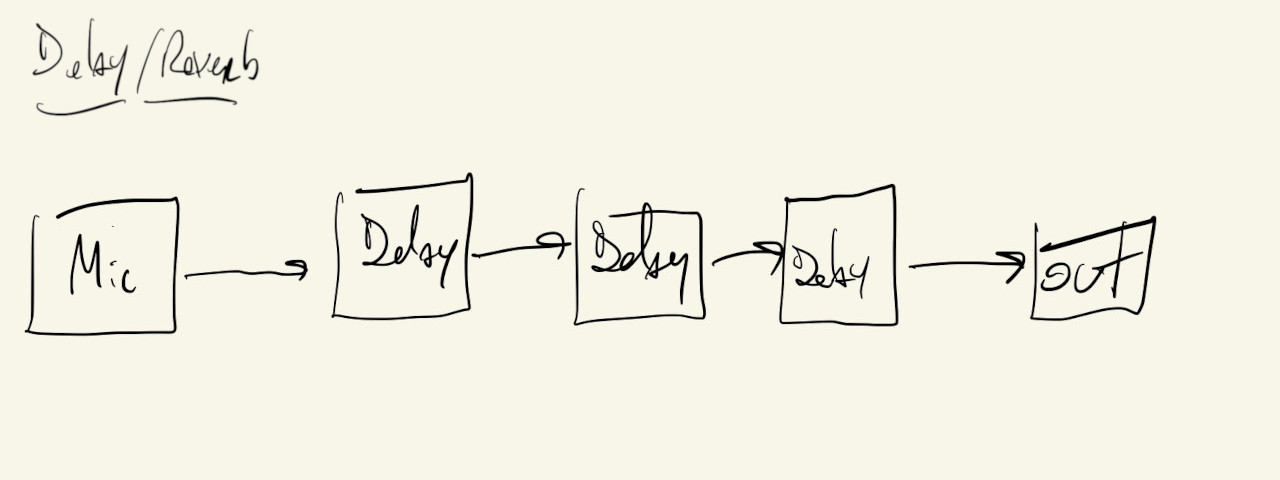
Pushing Delay
Now that we know how the p5.Delay and p5.Reverb modules work, maybe we can start using them in non-expected ways.
What happens if we chain a bunch of delay modules in a row? Or mix delays and reverbs?
Let’s start by building the following processing pipeline:

We’ll use a for loop to create the modules and push them onto an array, and then we can wire up the edge cases:
for (let i = 0; i < NUM_DELAYS; i++) {
  let mDelay = new p5.Delay();
  mDelay.delayTime(DELAY_TIME);

  // connect output of previous delay to input
  mDelays[i - 1].connect(mDelay);

  mDelays.push(mDelay);
}

// connect audio file module to first delay
mSound.connect(mDelays[0]);

// connect last delay to output
mDelays[mDelays.length - 1].connect(p5.soundOut);
And the full sketch, with some adjustable parameters:
Audio Input
We can easily change the above sketch to use a microphone instead of a pre-recorded file if we want to add the effect to our own voice in real time:
We just add a p5.AudioIn object to get the sound from the microphone and a boolean variable isMicOn to toggle the microphone on and off:
NOTE: sketches that use the microphone won’t work here. They have to be opened in a new window directly from their LINK.
Full Effect
The final example includes putting something together that combines a lot of what we looked at so far.
The idea is to add a noticeable delay on the lower frequencies, to artificially add more bass drum hits, and at the same time add some reverb effects to the hi-hat, so it sounds like an extra instrument.
We will work towards this pipeline, one effect at a time:

First, the low-frequency path:
mSound.connect(mFilterLow);
mFilterLow.connect(mDelay);
mDelay.connect(p5.soundOut);
With a toggle, to check the effect:
Now, the high-frequency path:
mSound.connect(mFilterHigh);
mFilterHigh.connect(mReverb);
mReverb.connect(p5.soundOut);
With a toggle:
And, putting it all together, with a toggle: