Blinking Beeping Moving Sensing
Class page for IDM NYU DM-UY 4913 J Fall 2024
Syllabus Weekly Schedule Assignments & Projects Resources Cheat Sheet
BLE communication with a microcontroller
Intro
Bluetooth is great for local wireless communication. It has an idealized range of 10 meters, but real world conditions can reduce that signifigantly (size and placement of antenna, physical or other wireless interference, etc.).
Bluetooth 4.0, aka Bluetooth Low Energy (BLE), made some signfifgant changes to how it works with the benefit of it needing less electrical consumption.
To use the BLE capabilities of your mcirocontrollwer (that’s the Nano BLE 33), you’ll want to install the Arduino BLE library. This tutorial can walk you through installing libraries if you’re unclear how to do so.
About BLE
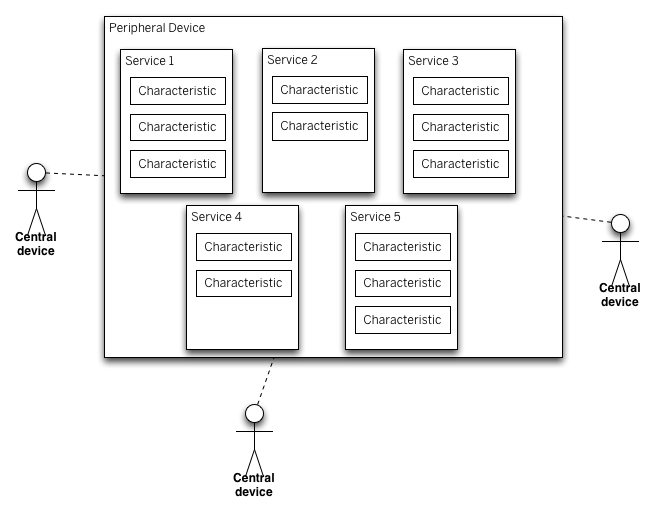
BLE devises are either central or peripherals. Peripheral devices offer services that central devices can receive. My watch is a perihiperal that connects to my phone, which acts as a central device.
Peripherals have services which have characteristics. Characteristics have values, which central devices can read, write, or subscribe to. My watch, for example, may have a “health” service, which has “pulse”, “sleep”, and “steps” characteristics.
- Read: ask the peripheral to send back the current value of the characteristic. Often used for characteristics that don’t change very often, for example characteristics used for configuration, version numbers, etc.
- Write: modify the value of the characteristic. Often used for things that are like commands, for example telling the peripheral to turn a motor on or off.
- (Subscribe) Indicate and Notify: ask the peripheral to continuously send updated values of the characteristic, without the central having to constantly ask for it.
BLE services, characteristics, and devices have Universally Unique Identifiers or UUIDs. These are 128-bit numbers that uniquely describe each of these components. While some UUIDs are reserved for particular functions, you will generlaly want to roll your own. You can generate UUIDs with the Online UUID Generator.
Process of using BLE
A central device initiates a connection after it discovers a peripherial which is advertising its services.
On the peripheral side, you will want to
- Set the name
- Establish services
- Add characteristics to services
- Start advertising the services to any central devices
On the central side, you’ll
- Scan and connect to a peripheral
- Check for services
- Check for characteristics
- Read, write, or subscribe to characteristics
You can use an application like lightBlue for iOS or Android, Blue See for macOS or BLE Analyzer for Windows. These will allow you to scan for any BLE peripherals and connect to any advertised services and are quite useful for debugging.
First steps
- Open this sketch. It allows you to control the brightness of an LED on Pin 2 LED from a central device. To demo, we’ll first use a central app like BlueSee.
- The sketch first sets a service and characteristic UUID. If youre doing this in the lab, or in class, generate a unique UUID for the service and characteristic.
- In setup(), you name the service (maybe change this too, so you knwo it’s yours), add characteristics, and start advertisting.
- In loop(), you wait for a connection from a central device.
- Your scanner may be able to send hex, ASCII, or bytes to the connected device.
Connecting to p5.js
There is a p5js ble library that allows Chrome to connnect to BLE devices. You can include the library in an index.html file like so :
<script
  src="https://unpkg.com/p5ble@0.0.7/dist/p5.ble.js"
  type="text/javascript"
></script>
sending data to the Arduino from p5
This p5 example will allow you to connect to a browser and change the brightness of the LED with a slider. If you changed the UUID of your device, it won’t work until you change the source and update the service to your UUID in the p5 sketch.
sending data to p5 from the Arduino
This Arduino sketch has a button connected to pin 2. When the button state changes, it sends a 1 or a 0 to a conected Central device. In this case, we change a circle to a square in a p5 sketch. The code for the p5 sketch can be found here.
Connect 2 Arduinios together via BLE
The BLE library allows microcontrollers to act as central devices too!
In the Arduino IDM, go to File->Examples->ArduinoBLE->Central->LedControl. Upload this to a board with a button attached to pin 2. After initializing the BLE library in setup(), BLE.scanForUuid() looks for a specific UUID advertised by a peripheral.
This example is thorough in its checking for characteristics that match exactly the peripheral we want to speak to. This makes it quite reliable.
In the loop() of the program, it will connect to a peripheral, verify the local name (something that IDs it as yours), and stop scanning when it finds the appropriate peripheral. The controlled() function checks to make sure it’s connected and looks for any attributes. This allows us to retreive the characteristics - in this case, it searches for the specific one to controll the LED. It checks to make sure the peripheral’s characteristic is writable, then reads the value of the button, sening a byte of 1 or 0 if the switch has changed since the last time it was read.
The peripheral code (found in File->Examples->ArduinoBLE->Peripheral->LED) uses the exat same peripheral code we used previously in our first exampel, but only receiving an on/off instead of a value of 0-255.